 |
SiteMinder Version 3.51
| |||||||||||||||||||||||||||||||||||||||||||||||||||||||||||||||||||||||||||||||||
ContentsExecutive Summary
Disclosure
Acknowledgement |
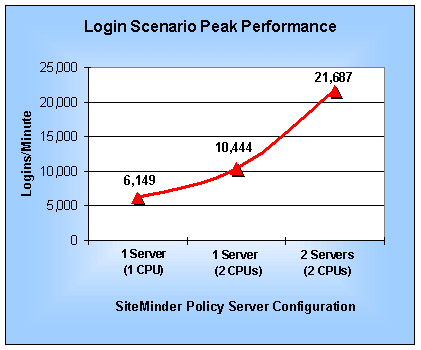
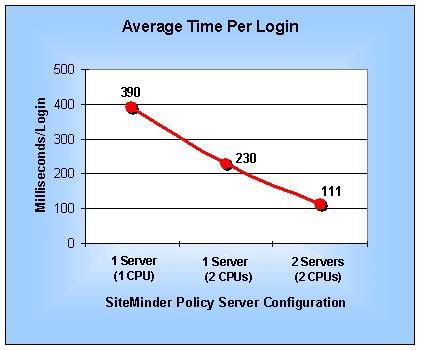
Executive SummarySiteMinder Version 3.51 Provides Fast, Scalable Performance for Web Site LoginsMindcraft®tested the performance of Netegrity's SiteMinder Version 3.51 at Sun's Enterprise Technology Center lab running on Sun Enterprise 450 servers. For these tests we used Mindcraft's iLOAD MVP™ test tool running the AuthMark™ Benchmark Login Scenario to simulate 100,000 users logging into Web servers that used SiteMinder for authentications and authorizations. All tests were done using Netscape Directory Server 4.0 with 1,000,000 users in the directory. The details of the test are given in the Benchmark section. The detailed benchmark results are covered in the Performance Results section. Figure 1 summarizes the peak login performance measured in logins per minute for a single SiteMinder server with one and two CPUs and for two SiteMinder servers with dual CPUs in a load-balancing configuration. Figure 2 shows the corresponding average time needed per login. The tests were done without caching in the SiteMinder Web agent in order to demonstrate a worst-case scenario of 100,000 different users accessing one Web page each. The AuthMark Login Scenario requires one user authentication and one access authorization to be processed through the Web agent to the SiteMinder server and in turn through to the directory server and the information to be returned via the same path | |||||||||||||||||||||||||||||||||||||||||||||||||||||||||||||||||||||||||||||||||
|
Figure 1 : SiteMinder Server AuthMark Login Scenario
Peak Performance | ||||||||||||||||||||||||||||||||||||||||||||||||||||||||||||||||||||||||||||||||||
|
Figure 2:
SiteMinder Server AuthMark
Login Scenario Average Time per Login
Our tests demonstrate that SiteMinder is a high-performance, scalable user management system capable of satisfying the performance needs of the most demanding Web sites. Performance AnalysisWe suggest that you review the details of the AuthMark Login Scenario Benchmark specified below in order to have the context to understand the discussion in this section. Login Performance AnalysisThe performance measurements shown in Figure 1 are for the warmed-up Login Scenario tests. These tests show SiteMinder's performance on three different server configurations: a single server with one CPU, a single server with two CPUs, and two servers with two CPUs. Table 1 show the performance scaling we measured for SiteMinder. Table 1 : SiteMinder Performance Scaling
The CPU utilization of the various servers will give you insight into how to configure an environment to get the maximum performance from SiteMinder. Table 2 shows the CPU utilization on each of the servers during the one server, 1 CPU test. It shows that the SiteMinder policy server is saturated while the other servers are lightly loaded. So, if you want to use a single SiteMinder policy server, use one with the fastest CPU available to you so that it will be able to handle the load you need. Table 2: Server CPU Utilization for a Single CPU SiteMinder Policy Server
Table 3 shows the CPU utilization on each of the servers during the one server, two-CPU SiteMinder Policy server test. It shows that the SiteMinder policy server is fully utilized as performance scales up 70% from a single CPU server. This level of scalability means that you can economically justify adding a second CPU to a SiteMinder policy server. Table 3 : Server CPU Utilization for a Two-CPU SiteMinder Policy Server
Table 4 shows the CPU utilization on each of the servers during the two server, two-CPU SiteMinder Policy server test. The SiteMinder policy server CPU utilization shows that SiteMinder is load balancing across both policy servers, although it is not sharing the load evenly. However, the 110% performance increase over a single dual-CPU policy server shows that SiteMinder is able to make better use of the more heavily loaded system when it is load balancing with another server. Thus, if you need the highest possible authentication performance at your Web site, use multiple, load-balanced SiteMinder policy servers. Table 4 : Server CPU Utilization for Two dual-CPU SiteMinder Policy Servers
Login Performance ConclusionsSiteMinder's performance for logins (authentications) scales extremely well as you increase the speed of the server CPU, add a CPU to the server, and add an additional server in a load-balancing configuration. The SiteMinder policy server configuration options let you balance the authentication server cost with the performance you need. BenchmarkThe AuthMark Benchmark is designed to test the performance of products that provide authentication and authorization services in support of Web servers. Authentication is the process of verifying who a users is. Authorization is the process of verifying that an authenticated user is allowed to see or to use a particular resource; in the case of a Web server such resources include HTML files, graphic files, and programs that generate Web pages dynamically. AuthMark simulates a large number of users accessing a Web server via their browsers. This approach permits AuthMark to test authentication and authorization performance independent of the technology used to provide those services. AuthMark Login ScenarioThe AuthMark Login Scenario focuses on testing authentication. We call it the Login Scenario because authentication is done the first time a user accesses a protected part of a Web site, just like a login. The HTTP 1.0 and 1.1 protocols define the steps a browser follows for authentication. Some of the steps are visible level to you and others are not. It is important to understand what happens during an authorization in order to understand what the Login Scenario measurements mean. Authorization ProcessThe following simplified sequence will walk you through the authorization process and show you how what you see ties in with the authorization process:
Notice that the URL you clicked on or entered is actually sent twice (in steps 1 and 6). This means that the authentication system is used twice—first, it finds out that the requested URL requires the user be authenticated, then it processes the authorization header when the request is resent. After the user is authenticated, the request is checked to see if the user is authorized to use the requested resource. The authorization check does not require any contact with the Web browser. Once a user has been authenticated, the Web browser automatically sends the authorization header whenever the user requests a URL in a realm requiring authentication. So, the user will not see a window open up asking him or her to login again to a realm that has already been visited. Login Scenario ParametersThe Login Scenario is based on the iLOAD MVP configuration parameter values in Table 5. Table 5: AuthMark Login Scenario Configuration Parameters
Running the Login ScenarioThe basic steps for running the Login Scenario are:
The Login Scenario test script uses 100,000 users randomly selected from the directory/database of 1,000,000 users. The tester is free to select the number of client test systems and the number of iLOAD MVP client threads to use. These are called the load generators . The tester selects the number of load generators to get the highest performance possible from the authentication/authorization system being tested. In order to obtain the peak performance from an authentication/authorization system, the tester may need to use multiple Web servers and directory/database servers. The tester is permitted, but not required, to do a warm-up run of the test scenario in order to get the servers to a state that would more likely represent the state they would be in during normal operation. The test report must state whether the servers were warmed-up or not. Products TestedServer ConfigurationsMindcraft used Sun Enterprise 450 servers for the Web servers, SiteMinder policy servers and the LDAP directory servers. Table 6 shows the server configurations we used. Table 6: Sun Enterprise 450 Configurations
Hardware Configuration
Software ConfigurationSolaris 7 Configuration
SiteMinder Configuration
Netscape Enterprise Server (Web Server) Configuration
Netscape Directory Server Configuration
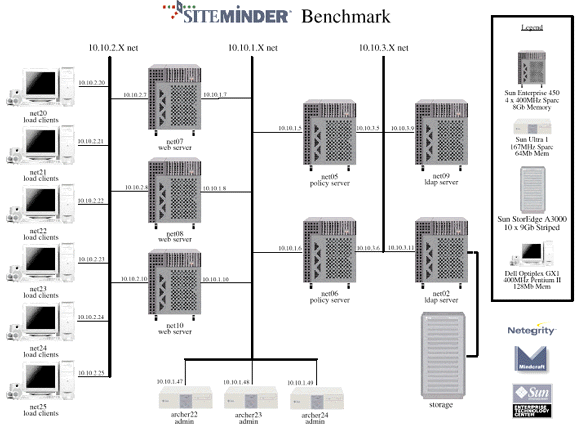
The Test Lab ConfigurationMindcraft ran these tests using four identically configured Dell Optiplex GX1 client test systems (six systems were available to be used). Table 7 shows the configuration of the client systems. Table 7: Configuration of the Client Test Systems
Switches were used for all network connections. Figure 3 shows a diagram of the complete test lab. We did not use all of the systems in the diagram. |
||||||||||||||||||||||||||||||||||||||||||||||||||||||||||||||||||||||||||||||||||
|
Figure 3: Test Lab Configuration
|
||||||||||||||||||||||||||||||||||||||||||||||||||||||||||||||||||||||||||||||||||
Mindcraft CertificationMindcraft certifies that the results reported accurately represent the performance of SiteMinder 3.51 running on Sun Enterprise 450 servers configured as specified herein and as measured by AuthMark benchmark using its Login Scenario. Our test results should be reproducible by others using the same test lab configuration, the same Sun computers, and the software configurations documented in this report. iLOAD MVP OverviewiLOAD MVP is a general-purpose, script-driven capacity planning, benchmarking, and regression testing tool. The major components of iLOAD MVP are:
iLOAD MVP provides the capabilities needed to test high-performance servers with a small number of client systems. Its capabilities include:
Specifications of iLOAD MVP subject to change without notice.
Change Information
NOTICE: The information in this publication is subject to change without notice. MINDCRAFT, INC. SHALL NOT BE LIABLE FOR ERRORS OR OMISSIONS CONTAINED HEREIN, NOR FOR INCIDENTAL OR CONSEQUENTIAL DAMAGES RESULTING FROM THE FURNISHING, PERFORMANCE, OR USE OF THIS MATERIAL. This publication does not constitute an endorsement of the product or products that were tested. This test is not a determination of product quality or correctness, nor does it ensure compliance with any federal, state or local requirements. Mindcraft is a registered trademark of Mindcraft, Inc. iLOAD MVP and AuthMark are trademarks of Mindcraft, Inc. Product and corporate names mentioned herein are trademarks and/or registered trademarks of their respective companies.
| ||||||||||||||||||||||||||||||||||||||||||||||||||||||||||||||||||||||||||||||||||

Mindcraft is a registered trademark of Mindcraft, Inc.
Product and corporate names mentioned herein are trademarks and/or registered trademarks of their respective owners.
For more information, contact usat: info@mindcraft.com
Phone: +1 (408) 395-2404
Fax: +1 (408) 395-6324